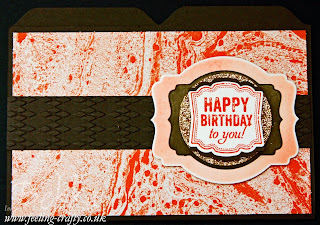
I love my Framelit Dies and for this week's Find Out About Friday I am going to show you something fun you can do with them (other than just cutting out great shapes!) Adding borders and layers to a card can really enhance how your card looks and today I am going to show you how you can get borders and a beautifully shaded effect using your Framelit Dies.
This card shows you some of the effects you can get.
So how do you get that look? Firstly you need to cut out your shape with the die of your choice. I have used the Deco Labels Set for these projects. Do NOT push the card out of the die, instead carefully place it cutting side down on your work surface. I always work on some grid paper and you may want to add something under that when doing this, although I have never cut through my paper. Once you have placed the die and the card down take a sponge and your favourite ink and gently swirl on some colour.
When you take the die off you will have a coloured shape with a thin border in the origninal card colour. The sample I showed you has one layer sponged with Tangerine Tango and then the Early Espresso Layer was sponged with Gold Metalic Ink.
Now this is not the only way you can create a great border with your Framelit Dies. You can also create a solid line border. Cut your shape and again leave it in your die. Again place it cutting side down on your table and then take the narrow end of a Stampin' Write Marker and carefully trace around the inside as shown here.
And here are the two types of shading and borders side by side - ready to add to a project.
And here they are on another card created with the wonderful Envelope Punch Board. The papers I have used are from Venetian Romance and the stamps are from Label Love and I have also used the matching Artisan Label Punch (save 15% when you buy these stamps and this punch together - click here)
I hope you have enjoyed today's tutorial and that you give it a go
Happy Stampin'
To purchase the items used to make this project visit my on line store at www.bekka.stampinup.net, or just click on them above to go straight to them in the store. When you order before the 30 December use this hostess code.
Pin It


No comments:
Post a Comment