Wednesday 29 February 2012

Simply Adored Class Projects

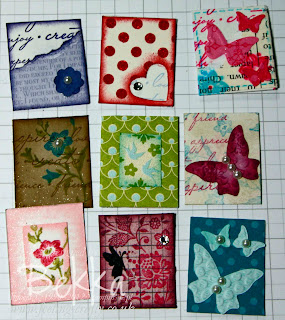
Today I am going to share some of the wonderful inserts that a couple of the ladies who attended my recent Simply Adorned Class made for their Charms.  I really enjoyed this class and seeing people create beautiful little works of art that I know they are now wearing with pride.
Simply Adorned Inserts


If you would like to find out more about upcoming classes click here, or email bekka@feeling-crafty.co.uk

Happy Stampin'
Bekka Prideaux, Independent Stampin' Up! Demonstrator

Pin It

Tuesday 28 February 2012

Hello Borderlines

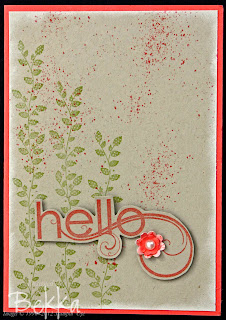
One of my favourite Stamp Sets in the current Stampin' Up! Mini Catalogue is Borderlines.  It is fantastic for card making, scrapbooking and for art journalling.  
Hello, Borderlines Stamp Set

Here I have combined the beautiful leaf pattern with the Hello sentiment from the equally versatile My Friend Stamp Set.  

Did you know if you were to purchase both stamp sets in wood mount you could choose a Sale-a-Bration Stamp Set or Pack of Papers for free!  Brilliant - and you can find the details and the selection you can choose between here.  Just email bekka@feeling-crafty.co.uk to place your order.

Happy Stampin'
Bekka Prideaux, Independent Stampin' Up! Demonstrator

Pin It

Monday 27 February 2012

Anyone for Cupcakes ...

Join us for a day of Cupcakes - mostly the calorie free kind on 31 March.  At this fun stamping day in Dunstable, we will make a number of projects featuring the wonderful Build a Cupcake Stamp Set from Stampin' Up!  Projects will include a handbag full of cards and a recipe tin.
Create a Cupcake Craft Day

The day costs £50 which includes a goodie bag with all the materials you will need on the day (plus a few to spare!) and your own Create a Cupcake Stamp Set.  If you book and pay for your place before the end of this month you will also get the coordinating Builder Cupcake Punch for FREE!

Full details of the day can be found here and to book your place email bekka@feeling-crafty.co.uk and hurry - you only have until midnight on Wednesday to get your Free Punch ...

Happy Stampin'
Bekka Prideaux Independent Stampin' Up! Demonstrator

Pin It

Sunday 26 February 2012

Two Tags Mini Book for the Team Social Stamping Day

Today I am going to share one of the projects from our Team Social Stamping Day yesterday.  I had a fantastic time and hope that everyone else did too.  

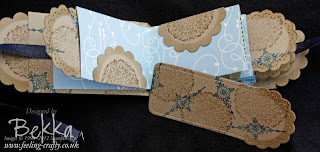
Mini Album featuring Two Tags and Artistic Etchings

This little mini book would make a great scrapbook album or a card with a collection of greetings.
Mini Album featuring Two Tags and Artistic Etchings

It uses the fabulous Two Tags Die as the pull out pages.  The stamp set I have used is Artistic Etchings.
Mini Album Featuring Two Tags and Artistic Etchings


One of the things I really enjoyed about yesterday was watching people take my basic design and make it their own - there were some wonderful variations and I wish I had thought to take photos of them!

Our Team Social Stamping Day gave me a chance to thank the team for all their hard work, and to celebrate their successes.  There was lots of creativity, lots of sharing of ideas and lots of laughter too.  New friendships were formed and others renewed.  We missed the people who were not able to make it, and I am looking forward to the next one!  If you would like to find out how you could be there email bekka@feeling-crafty.co.uk and lets chat.

Happy Stampin'
Bekka Prideaux, Independent Stampin' Up! Demonstrator

Pin It

Saturday 25 February 2012

Scrapbook Saturday - A Handbag Mini Album for the Team

I am so excited about today - I am going to be spending it with some of my wonderful team, stamping, chatting, laughing and celebrating their successes.  I have designed some projects and some challenges for them which I will share with you soon, but today I am going to share a project I designed for team training a few months ago.
Mocca Morning Handbag Mini Album

Featuring the wonderful Mocca Morning Papers, this Handbag Album is constructed from the Stampin' Up! Square Envelopes.
Mocca Morning Handbag Mini Album

The closure is made from the bookmark from the fantastic Two Tags Die (which we will be using today!), and features a butterfly from my favourite Beautiful Wings Embosslit.
Mocca Morning Handbag Mini Album

If you would like to join us for the next team day please get in touch.  Being a Demonstrator and being paid to do what I love - stamp and chat - is the best job I have ever had!  Email bekka@feeling-crafty.co.uk and lets arrange to talk

Happy Stampin'
Bekka Prideaux, Independent Stampin' Up! Demonstrator

Pin It

Friday 24 February 2012

Find Out About Friday - Using the Stampin' Up! Designer Embossing Frames in the middle of your card

... Without leaving a mark where the edge of the folder was.   On Sunday I showed you this card with the image from the Charming Stamp Set an Embossed Oval from the Stampin' Up! Designer Embossing Frames.
How to use the Stampin' Up! Designer Embossing Frames

It prompted several people to ask how I had embossed the oval in the middle of the card without getting marks from the edge of the embossing folder, so for this week's Find Out About Friday I thought I would share how with you.

The Designer Embossing Frames are approximately half the size of the other Stampin' Up! Embossing Folders which means you have a lot of flexibility over where you can place them on your card.  It does however mean that the edges of the embossing folder will be on the surface of your card and in some instances may leave a slight mark.  

If the mark is very pronounced you may want to check the 'sandwich' you are using on your Big Shot (or other similar machine).  My removing one thin layer from the sandwich you may exclude the problem.

However there may still be small marks, so the following trick will help you remove them all together.  As well as your embossing folder you will need a piece of sturdy card, for example the card you find at the back of a pack of Stampin' Up! Designer Series Paper.  Cut a piece of this just smaller than the back of your Designer Frames Embossing Folder.  Stick this to the back of your folder, on the outside, like this.  I used Snail adhesive to stick the card on.
How to use the Stampin' Up! Designer Embossing Frames without the sides leaving a mark

How to use the Stampin' Up! Designer Embossing Frames without the side leaving a mark

Now when you use your folder make sure you use less in your sandwich than normal - in the case of the Big Shot I use just my multi purpose platform with none of the tabs. 

I hope this helps you all use the Stampin' Up! Designer Frames Embossing Folders with ease and without extra marks  in the middle of your cards

Happy Stampin'
Bekka Prideaux, Independent Stampin' Up! Demonstrator

Pin It

Thursday 23 February 2012

Another Charming Class

Today is Eaton Bray Class Day and I am being joined by people taking both this month's Charming Card Class and people who will be Scrapbooking as part of this month's Scrapbook Club.  I am going to have a great day and I can't wait to get started!

So today I thought I would show you another of the Charming Cards that we will be making.  When I first looked at the Charming Stamp Set I thought it was a very pretty and feminine set, so I challenged myself to make a card that would be great for a man or a woman.  This is what I came up with.
Charming Thank You Card

The colours are Marina Mist and Rich Razzleberry and I have used a sentiment from the Petite Pairs Stamp Set along with images from the Charming Stamp Set.

Next Month's card class will feature the lovely Delicate Doilies Stamp Set - you can find out the details here.  To book your place just email bekka@feeling-crafty.co.uk and I look forward to seeing you in class.

Happy Stampin'
Bekka Prideaux, Independent Stampin' Up! Demonstrator

Pin It

Wednesday 22 February 2012

Celebrate your Birthday with Outlined Occasions

The lovely Outlined Occasions FREE Sale-a-Bration Stamp Set is fantastic for so many occasions, with gorgeous Thank You, Love and Celebration themes.  You can find out all about them and how to get your FREE set here.

Today I am going to show you a Birthday Card I made for one of my team who celebrated recently.
Outlined Occasions Birthday Card

I built the colour scheme around the lovely papers from the Tickets and Tags Simply Scrapping Kit, which is not just for Scrapping!

Those of you who checked out the link above will have spotted that now is a great time to join Stampin' Up!  As well as a fantastic value starter kit and an additional Free Stamp Set of any value from Stampin' Up!, you will be starting your business at one of the best times of year.  You will also get a welcome pack and lots of ongoing support from me.  Why not drop me an email, bekka@feeling-crafty.co.uk and lets arrange to chat and see if joining Stampin' Up! is for you.

Happy Stampin'
Bekka Prideaux Independent Stampin' Up! Demonstrator

Pin It

Tuesday 21 February 2012

Fresh Vintage Stamps!

I would love the Fresh Vintage Sale-a-Bration even if I had to pay for it - the fact it is a free stamp set just makes it all the more wonderful from my perspective!  Lets face it, it is great getting something this lovely for free.

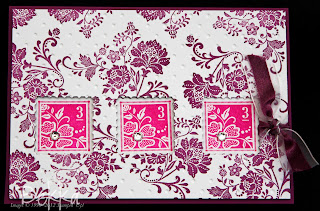
Today I am sharing a simple card made from this set that would be very easy to post.  The inset images are recessed using the coordinating Postage Stamp Punch.
Fresh Vintage with recessed Stamps

The White Organza ribbon was coloured using the coordinating Rich Razzleberry Marker Pen.

If you were to purchase the card, punch, inks, ribbon and rhinestones used on this card from me before the end of March, you too would qualify to get this stamp set for FREE.  Just email bekka@feeling-crafty.co.uk

Happy Stampin'
Bekka Prideaux Independent Stampin' Up! Demonstrator

Pin It

Monday 20 February 2012

Create Cupcakes at the Spring Stamping' Extravaganza

Today I have a quick card that features the lovely Create a Cupcake Stamp Set and matching Build a Cupcake Punch, along with a quick reminder!
Create a Cupcake from Stampin' Up!

The colours I have used are Melon Mambo, Lucky Limeade, Pool Party and Early Espresso.  

We will be using the Create a Cupcake Stamp Set at the Feeling Crafty Spring Stampin' Extravaganza on 31 March.  On the day we will make lots of beautiful projects including a hand bag of cards and a recipie tin.  You can find more details about the day here.  If you book your place by the end of this month, in addition to a generous goodie bag and your own stamp set to keep, you will also recieve the matching cupcake punch for FREE!  To book your place just email bekka@feeling-crafty.co.uk

Happy Stampin'
Bekka Prideaux, Interdependent Stampin' Up! Demonstrator

Pin It

Sunday 19 February 2012

Charming Card for a Sunday

Today I am going to share another of the cards that we made at my recent Charming Card Class.  This card features the beautiful flower that is part of this set - so pretty and so delicate.

Here I have coloured the image with my In Colour Markers and then embossed the over around the stamped image.
Charming Flower Card

If you would like to purchase this beautiful stamp set which certainly lives up to its name - Charming - please email bekka@feeling-crafty.co.uk

Happy Stampin'
Bekka Prideaux, Independent Stampin' Up! Demonstrator

Pin It

Saturday 18 February 2012

Scrapbook Saturday - Scrapbook Memory File the Stampin' Up! Way

One of the new products in Scrapbooking that a lot of people are talking about is something called the Memory File.  These have been described by their creator Heidi Swapp as a Scrapbook Page with a Mini Book on the inside.  They are interactive and a great way to collect together all the memories from one event.  They are a bit like a very large mini book, that fits inside your regular Scrapbook Album.

I loved the idea of these and when I got delivery of my photos from Panto decided to give it a try.  Here is the front.
Stamping Up Memory File

I have used the wonderful Tickets and Tags Simply Scrappin' Kit to create my  Memory File.  I love how the colours work and having the die cut adhesives made putting it together fun and easy.

When you open it up there is lots and lots of room to tell more of the stories about this year's Panto.  On the bottom right of the first page I have even included the programme.
Stamping Up Memory File

In the middle is a smaller page which contains a pocket.  When you turn this middle page this is what you see.
Stamping Up Memory File

On the far right is another interactive element - flip up pages showing pictures of all of the cast.  This was a great way to fit it lots and lots of pictures! 
Stamping Up Memory File

The middle page is also a pocket and inside is another little mini folder - you pull it out 
Stamping Up Memory File

and inside are lots more photos and some more pages!  I have added journalling to help me remember the script and why the photos I have chosen make me smile.  I used the Modern Label Punch for all of these to help everything feel like it belongs together.  I have also used all of the ric rac die cuts and the off cuts from these as they remind me of waves at sea which feels apt for our Pirate Panto.
Stamping Up Memory File

When you finally have looked at everything on the inside there is another full page on the back. 
Stamping Up Memory File

Once it is all in a page protector (and yes it does fit!) you see the main story on the front and back and for me it feels great knowing all the rest of the small stories are captured too.  All I have to do is pull out this Memory Folder to find them.  

Some of the stories I have been able to capture here would have been lost on a full 12x12 page but they fit perfectly into this format.  

I love that it will fit in my normal Scrapbook Album - previously for an event like this I would have created a mini album or 6x6 album to capture all the details and then made one or two 12x12 pages as kind of place markers in my main album.  This can make it all seem rather a daunting task, but using this concept I have already scrapped this year's panto and it finished less than a month ago!  

I have loved doing this project and plan to do more.  What would you create a Memory File for?

Happy Stampin'
Bekka Prideaux Independent Stampin' Up! Demonstrator

Pin It

Friday 17 February 2012

Find Out About Friday - How to make a Chevron Pattern with a Square Punch

When I was doing some research into upcoming crafting trends I noticed there were a lot of chevron patterns about so I thought I would have a little play and see if I could find an easy way to create this kind of pattern.  You can spend hours with rulers and set squares creating them but those of you who know me well will know that is really not my style and that I would want something much quicker and easier!

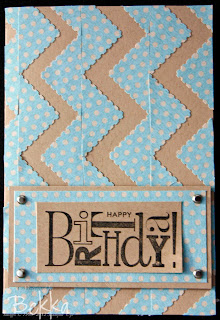
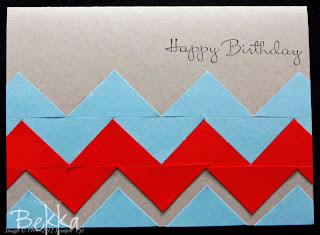
This card showcases what I have come up with. 

Chevron Pattern Birthday Card

So how is it done?  Well OK there is a big clue in the title - How to make a Chevron Pattern with a Square Punch!  So let me show you how I created this simplified version.
How to make a Chevorn Pattern Card

Take your square punch (or as in the first example the Postage Stamp Punch) and punch out some squares.  Cut each in half diagonally. Place the long side of some of the triangles along a straight line and then complete the pattern as shown below.
How to make a Chevron pattern with a Square Punch

I found when adding the chevrons to a card it was easiest to draw a line for the first row and use a wet glue as it gave me a little bit of wriggle room!  I let the triangles go off the side of the page and then when they were dry trimmed the edge of the card.

The papers used in the fist project are from the scrummy Tickets and Tags Simply Scrapping Kit (you will be seeing more of that tomorrow - this card just used some scraps!) and all the stamps are from the Happiest Birthday Wishes Hostess Stamp Set.  If you would like to get a group of your friends and discover more simple techniques like this one  and possibly earn yourself this Stamp Set for free please email bekka@feeling-crafty.co.uk

Happy Stampin'
Bekka Prideaux Independent Stampin' Up! Demonstrator

Pin It

Thursday 16 February 2012

More Charming Butterflies

Today I am going to share another card we made at class last weekend and will be making at class next week!  The class features the lovely Charming Stamp Set and if you let me know by noon tomorrow (Friday) you can still join us - just email bekka@feeling-crafty.co.uk
Charming Card with Butterfly

Today's card also features a butterfly - well having cut it with the Beautiful Wings Embosslit while creating the ones for yesterday's card it seemed silly not to use it!  The colours on this card are Concord Crush and Wisteria Wonder.

Happy Stampin'
Bekka Prideaux Independent Stampin' Up! Demonstrator

Pin It

Wednesday 15 February 2012

Charming Butterflies

On Sunday I showed you one of my new favourite colour combinations, Pool Party, Blushing Bride and Very Vanilla. This colour combination also made an appearance at Saturday's Card Making Class when we featured the lovely Charming Stamp Set.
Charming Card Making Class, Charming with Butterflies

This class can also be taken during the day on Thursday 23 February - if you would like to join us then please email bekka@feeling-crafty.co.uk by noon on Friday 17 February

Happy Stampin'
Pin It
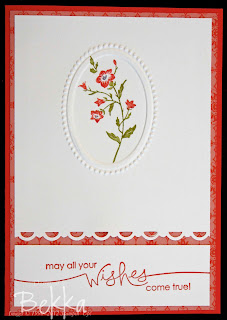
Tuesday 14 February 2012

Happy Valentines Day - Heart Corner Bookmarks

Today I have a little Valentines Gift for you all!

These cute little Heart Corner Bookmarks were made using the wonderful Everyday Enchantment Papers from Stampin' Up!
Everyday Enchantment Heart Corner Bookmarks

And this one was made from the scrummy First Edition Speciality Papers.
First Edition Heart Corner Bookmark

here it is in action (before I decorated it!) marking one of my favourite pages in the Mini Catalogue!
Heart Corner Bookmark

My gift to you?  Just email bekka@feeling-crafty.co.uk for a free tutorial on how to make these adorable Heart Corner Bookmarks.

Happy Stampin'
Bekka Prideaux Independent Stampin' Up! Demonstrator

Pin It

Monday 13 February 2012

Material Monday - Butterfly Card Accent

Welcome to Material Monday - an occasional series where I show you things I have made with the gorgeous Stampin' Up! Fabrics.  Today I am going to show you a card that I made for a lovely lady who has just joined my team.  The card features some rather cute fabric butterflies

The butterflies were cut using the Beautiful Wings Embosslit and just attached with a glue dot.  I love how the fabric, from the Spice Cake Collection has added some texture as well as some colour.  
Material Monday Fabric Butterfly Accent Card

Also featured on this card is the star from the FREE Sale-a-Bration Stamp Set, Sprinkled Expressions.  I wanted to include a star as my team are the Stampin' Superstars.  I am fortunate to have some wonderful people in my team, who are all achieving, or well on their way to achieving, their personal goals with Stampin' Up!  

For some this is building a career with a full time income, for others its a flexible income that fits around their family or their other work commitments, for some its about building their crafting network and for others its about saving money.  One thing that we all have in common though is being paid to do something we love - what better job could there be!  This is a particularly good time to start with Stampin' Up! and if you would like to know more about how joining Stampin' Up! could work for you email bekka@feeling-crafty.co.uk and lets see if its the right opportunity for you.

Happy Stampin'
Bekka Prideaux Independent Stampin' Up! Demonstrator

Pin It